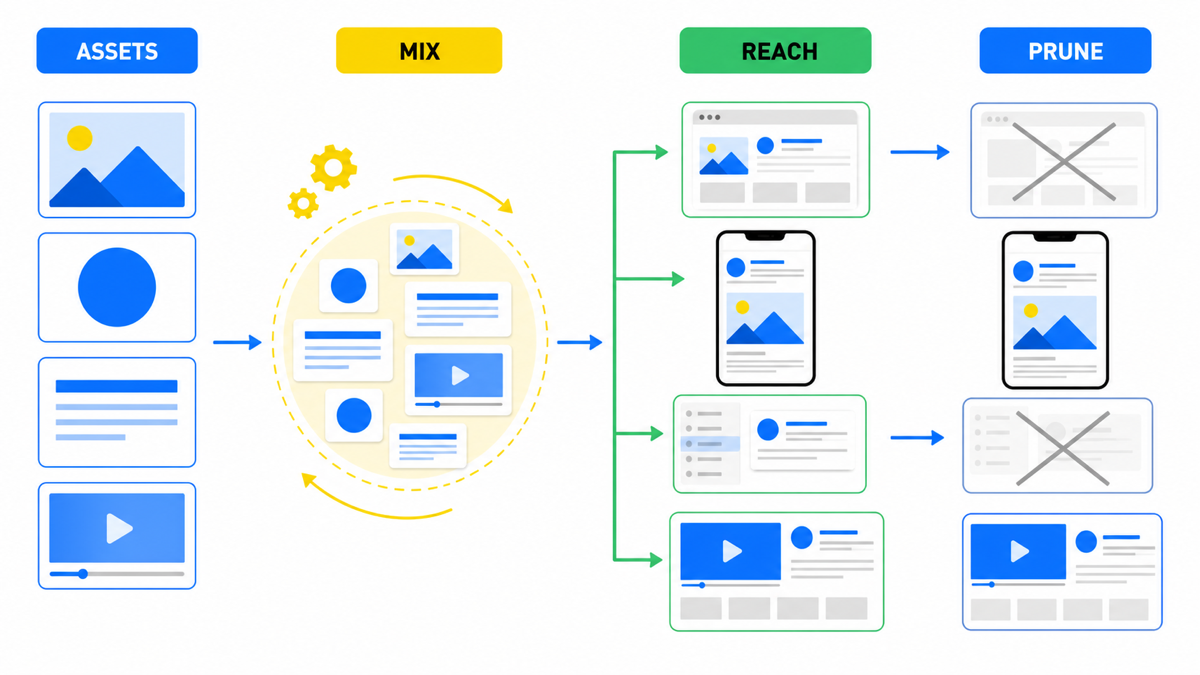
The Google Display Network (GDN) is Google’s network of partner websites and apps that get paid to run ads. Google also places image ads directly on its own properties, inside Gmail and on YouTube.
The ad looks different on every placement. It is assembled from images, headlines, and video you supply separately, and Google automatically adapts the combination to fit each specific site or app.
GDN campaigns are one of Google’s two oldest ad formats, the other being Search. A click on the Display Network typically costs less than a click on Search, so it pays to know how to set up GDN properly and use that cost gap to your advantage.
What Google Display Network Ads Actually Look Like
On any site that partners with Google, you will see GDN ads appear as banners at the top, bottom, or middle of the page, or alongside an article on the left or right. You can always tell it is a Google ad by the small blue triangle icon in the banner’s top right corner.
You will also see GDN creative on YouTube, where display ads show up as images between videos in the feed.
One common way publishers monetize a site today is what’s known as Made for AdSense: building a site whose main purpose is earning money by showing other people’s ads. AdSense is Google’s program for site owners who want to earn money by displaying someone else’s ads, while Google Ads is the system for advertisers who create their own ads and want to run them on those sites.
How to Set Up a Google Display Network Campaign
To set up a GDN campaign in Google Ads, follow these steps:
Where GDN Most Often Bleeds Budget
On GDN I keep tight control over placements, exclusions, and audience composition, and I analyze each one’s performance separately. Without that hygiene, automatic reach expansion happily routes budget toward impressions that are technically eligible but practically useless.
The mechanics of excluding placements and unsuitable content are covered in Google’s own guide for Display Network campaigns.
- Open your Google Ads account.
- Click “+ New campaign”.
- Campaign goal: skip goal guidance.
- Campaign type: Display.
- Campaign name: I recommend including the product, the destination page, “GDN,” and the country, something like Brand_Web_GDN_US.
- Campaign settings include:
- Locations: target every country, just your own, or specific major cities.
- Languages: the browser language of the people you want to reach.
- Budget and bidding.
- Average daily budget: how much you are willing to spend.
- Bidding: choose whether you pay for conversions, conversion value, or impressions. You can also bid manually and set your own cost per click. I recommend Target CPA. If you leave the target price blank, the strategy runs in Maximize Conversions mode. If you already know your target cost per conversion, enter it.
- Targeting.
- Audience segments. Pick every custom segment and remarketing list you have (people who already visited your site). The “Browse” tab lets you add Google’s stock audiences, but they are not effective enough on GDN to spend much time there. To fine-tune segments, use “Search” rather than “Browse”: mark exactly what you want and exclude irrelevant interests. I recommend turning Optimized Targeting off.
- Demographics. Age, gender, parental status, and household income. Every group is selected to receive ads by default. To exclude a group, click it and deselect it, for example if you do not want to show ads to under-25s or over-45s. Each row also has an “Unknown” option, and I recommend leaving it active, because Google frequently cannot identify a user well enough to place them in any category.
- Keywords, not the search terms Google tracks in Search, but words that appear on the page where your ad will run.
- Website topics.
- Placements.
Targeting by those last three, keywords, topics, and placements, rarely performs well, and I do not recommend spending much time setting them up on GDN.
- Ad creative. When you build a responsive display ad, you provide:
- Final URL of your landing page.
- Business name.
- Images: upload several variations with different crops.
- Logos in two formats: 4:1 and 1:1.
- Add video if it was produced for in-stream placements.
- Headlines, a long headline, and a description.
- Additional settings. You can edit the call-to-action text and set your own colors, which controls the color of the button people click. I use white as the main color and a bright accent color for the button itself to draw the eye.
Once the GDN setup is done, review the ad preview and publish. One ad group is enough for a GDN campaign, since you can attach many audiences to it later and analyze and optimize from there.
My e-book “19 Google Ads Secrets”: how to get the most out of Google Ads without draining your budget, drawn from real campaigns and tests.
See the book →What a Smart Display Campaign Actually Is
Google’s interface used to carry a separate Smart Display campaign type. That logic has effectively been absorbed into automated settings, responsive display ads, and Performance Max. If you are setting up GDN specifically, judge it by bidding strategy, audiences, optimized targeting, and placement quality rather than by the old format name. The bidding strategy options remain:
- Target CPA;
- Target ROAS;
- Maximize Conversions.
Conversion tracking is not optional here.
GDN’s automation combines your images, video, logos, headlines, and descriptions, and adapts the ad to fit whatever placement it is showing on. It mixes and matches different images and headlines, tracks which combinations perform best, and leans into those going forward.
How to Optimize Google Display Network Campaigns
There are a few reliable ways to optimize a GDN campaign:
- By the numbers. Every ad shows CTR, cost per click, spend, and conversions. Click “Asset details” to see how each individual image or headline performed, rated from low to high. The “Combinations” tab shows which headlines and images most often ran together.
- By audience. Check how each audience responds to the ad, custom segments, interest-based, in-market, and everything else you targeted. Use the data to raise or lower bids per audience, add new ones, and cut the ones that are not working.
- By placement. The “Where ads showed” report lists every site and app your ad ran on. Flag any site you do not want to appear on, click “Edit,” and choose “Exclude from campaign.” This keeps your impressions limited to the placements that actually deliver conversions.
Pre-Launch GDN Checklist
- Pick a campaign goal and never mix cold reach with remarketing in the same ad group.
- Double-check geography and languages: on GDN, browser language is not the same as the person’s actual language.
- Set a budget that gives you 7 to 14 days of data before judging placements and audiences.
- Choose a conversion-based bidding strategy only if tracking is already set up and the event fires often enough.
- Leave the unknown demographic segments turned on until you have checked the actual data.
- Upload several images, logos in both 1:1 and 4:1, short headlines, and a clear description of the offer.
- Once it is live, the first job is pruning placements, apps, and audiences that are not converting.
Bottom Line on GDN Setup
GDN has been around a long time, and on the whole it is not a high-performing channel, but in roughly 20% of cases it delivers cheap, quality leads. That is exactly why you test it early rather than trust it on faith: keep it running where it works, and shut it off where it does not.
What’s Next